You can send soil samples to a lab or you can perform these simple tests at home and get a very good idea about what type of soil you have. When you gather samples, get them from at jar1least three separate locations in your yard – you can take as many as you want, but three is the minimum, since soil is going to vary at least a bit even on the same plot of land.
First, find an empty, clean quart jar (an old mayonnaise jar works very well for this test.) Fill the jar about 2/3 full with clean water. Next, take a sample of soil (break the large clods apart so it will fit through the jar opening) and fill the jar and water until the jar is nearly full, leaving about 1/2″ of air space at the top. Screw on the lid and shake it vigorously for a minute or two, until all the soil particles are broken down into suspension in the water.

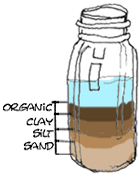
Now, allow the suspended soil to settle for about a minute, and place a mark on the side of the jar at the top of the layer that has settled out. This is the sand layer comprised primarily of sand and larger particles. Set the jar aside, being careful not to mix the sand layer that has already settled and wait approximately an hour. Now, place a mark on the side of the jar at the top of the next layer to settle out. This is the silt layer. Again, place the jar aside for a full day, being careful not to shake or mix the layers that have settled out. After 24 hours, or when the water is once again clear (more or less), place a mark jar3
Use a ruler to measure the total column height of the settled material. If the bands are wide enough, measure the height of the individual bands of sand, silt, clay and organic matter in the container. With this information, you can calculate the percentage of each type of material compared to the entire amount of material that has settled.